Published 11/2022
MP4 | Video: h264, 1920×1080 | Audio: AAC, 44.1 KHz
Language: English | Size: 1.31 GB | Duration: 2h 7m
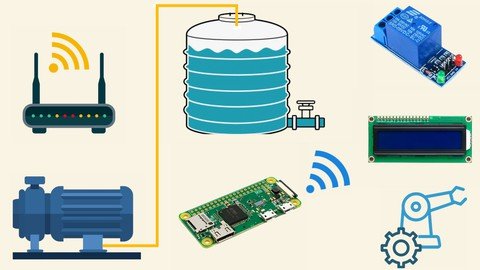
Learn how to automate your motor pump and save water and energy using the mini Raspberry Pi
What you’ll learn
We will get to know about the project concept and the problem which we are going to solve by developing this project.
Thereafter, we will cover the stepwise approach to be followed, so that the learning curve remains easier for the project development.
Going forward, we will understand the complete hardware requirements for the project development and its individual usage.
Then we will proceed to learn about Raspberry Pi and its detailed specification.
We will then came to know, how to download and burn the latest version of the operating system to the SD card and configure the Pi for its usage via SSH.
We will then learn how to assign a static IP address to the Raspberry Pi by making certain changes in the operating system files.
Thereafter, we will proceed with the update and upgrade of the software library packages.
We will then step into the world of physical computing and learn how to test the motor pump which we have purchased for the project development.
We will then learn about the working principle of the relay and test the functioning of the relay using our customized program.
We will then get to know about the distance measurement sensor and how to assemble the same with the Raspberry Pi.
Thereafter, we will understand the program using which we can measure the accurate distance between the object and the sensor.
Finally, we will test the last module of the project which is our LCD. We will first learn about the I2C detection and then programmed the LCD to print.
After testing all the modules, we will start the main project. We will follow a standard circuit diagram and completed the assembly of the tank automation.
Finally, we will understand the set of two different programs which act as the driving force for the execution of the project,
Requirements
Newbies can also take this course using any version of the Raspberry Pi. Basic knowledge of any programming language is enough to understand the course.
Description
Hello Everyone, I would like to introduce you to a brand new online course “Complete water Tank Automation using Raspberry Pi”. I have always been a firm believer in learning by doing and in this course, you will learn what you need to know by hands-on experience. You don’t need any special knowledge except basic computer skills to get started with the course. Every one of you comes from a different background and hence the course is crafted from basic to advanced level with minute details in every lecture.The course is divided into 8 sections. In the first section, we will get to know about the project concept and how we are going to solve a real-time problem by developing this project. Thereafter we will understand the stepwise approach to be followed so that the learning curve remains easier and the project development gets completed without any major technical issues.In the second section, we will understand the complete hardware modules which are required to build the project and the individual uses of each hardware component. Thereafter we will learn about Raspberry Pi and its complete specifications in detail.In the third section, we will begin setting up the Raspberry Pi. We will learn to download the latest operating system and burn it to the micro SD card. And, then we will proceed with the installation of the IP scanner tool using which we will fetch the dynamic IP address of the Raspberry Pi and then establish the connection via the putty terminal.In the fourth section, we will learn how to assign a static IP address to the Raspberry Pi. As you are already aware that the dynamic IP address is temporarily assigned by your Internet Service Provider. If a dynamic address is not in use, it can be automatically assigned to a different device. So every time you scan your WIFI network you may get a different IP address for your Raspberry Pi. The static IP address will help in fixing this issue. Once we complete this, we will go ahead with updating our software library before proceeding with the project development.The fifth section begins with the testing of the hardware modules. Testing each module separately will give you clarity about each hardware component’s functionality and the working principle. Here we will first start with the motor pump and then the relay. We will understand the functioning of the relay and then go through the circuit diagram. And, then with the help of the basic project, we can test whether the relay is functioning or not.In the sixth section, we will get to know the working principle of the distance measurement module. With the help of the circuit diagram, we will establish the connection between the Pi and the distance sensor. And, then we will write a program using which we can measure the distance between the object and the sensor module. We will also cross-check whether the value returned by the sensor is correct or not.In the seventh section, we will get to know about the Liquid Crystal Display. Thereafter we will understand a circuit diagram using which we can connect the LCD module with the Raspberry Pi. Once done, we will learn about the I2C protocol and how the I2C devices are detected via the python libraries and commands. We will then proceed with the code, using which we will display a couple of sentences on the LCD screen just to make sure that the device is functioning properly.Finally, in the eighth section, we will build the final project, the automation of the water tank. We will follow a standard circuit diagram which will help us to connect all the modules. And, then we will understand the code using which the project will be executed. You will also see a real-time demonstration of the project.Please note that the project covered in the course should work on any version of Raspberry Pi.All the lectures contain English subtitles for clear and better understanding. If you face any technical issues, please post your query in the question and answer section and our technical support executive will get back to you within 1 business day.At the end of the course, you will have a solid foundation on Raspberry Pi, Distance sensor module, LCD module, etc. So apart from building this project, you will also find it easy to build any other project of your choice.Thank You
Overview
Section 1: Project concept and stepwise approach
Lecture 1 Project Concept
Lecture 2 Stepwise approach for the project development
Section 2: Hardware requirements and introduction to Raspberry Pi
Lecture 3 Complete Hardware Requirements for the project
Lecture 4 Document – Hardware Module List
Lecture 5 Introduction to Raspberry Pi
Section 3: Setting up Raspberry Pi
Lecture 6 Setting up Raspberry Pi Zero Wireless
Lecture 7 Understanding the network scanner tool
Lecture 8 Fetching the dynamic IP address
Lecture 9 Establishing connection using the dynamic IP
Section 4: Static IP and software upgrade
Lecture 10 Making the IP address static
Lecture 11 Update & Upgrade
Section 5: Motor Pump and the relay testing
Lecture 12 Testing the motor pump
Lecture 13 Understanding Relay & the Circuit Diagram
Lecture 14 Circuit Diagram – Relay connection with the Raspberry Pi
Lecture 15 Understanding the source code – Relay Testing
Lecture 16 Real-Time Demonstration – Reay Testing
Lecture 17 Complete source Code – Relay Testing
Section 6: Distance Sensor Testing process
Lecture 18 Working principle of the distance measurement sensor and Circuit Diagram
Lecture 19 Circuit Diagram – Connecting distance sensor with the Raspberry Pi
Lecture 20 Understanding the source code – Testing Distance Sensor
Lecture 21 Real-time Demonstration – Testing distance sensor
Lecture 22 Complete Source Code – Testing Distance Sensor
Section 7: Liquid Crystal Display Evaluation
Lecture 23 Understanding the LCD module
Lecture 24 Understanding the I2C protocol
Lecture 25 LCD connection with the Raspberry Pi
Lecture 26 Circuit Diagram – LCD connection with the Raspberry Pi
Lecture 27 I2C configuration on the Raspberry Pi
Lecture 28 Understanding the code – Testing 16×2 LCD
Lecture 29 Real time Demonstration – LCD Testing
Lecture 30 Complete Source Code – LCD Testing
Section 8: Tank Automation
Lecture 31 Understanding the Tank Automation Circuit Diagram
Lecture 32 Circuit Diagram – Water Tank Automation
Lecture 33 Understanding the source code – Tank Automation
Lecture 34 Real time demonstration – Water Tank Automation
Lecture 35 Source Code – Water Tank Automation
Lecture 36 Conclusion
Beginner Python developer, tech enthusiast or anyone who is interested to build a hardware project to solve a real time problem, can take this course.
Password/解压密码www.tbtos.com
转载请注明:0daytown » Complete Water Tank Automation Using Raspberry Pi